While I’m an art educator by trade, having small people pull at my pants has turned me into a mini-alchemist who’s suddenly found herself reading books to her kids about Galileo and brewing all sorts of concoctions in our kitchen (vinegar and baking soda, anyone?). Preschoolers are simply curious and see no boundaries between art and science, making this celery experiment a wonderful early STEAM (science, technology, engineering, art, and math) activity for young children.

The celery science experiment is easy to achieve with basic kitchen materials and it’s embedded with all sorts of opportunities for introducing the scientific method (in short: asking scientific questions, making predictions, and conducting an experiment).
 soak up food coloring in this colorful science experiment: A Scientific Experiment with Celery and Food Coloring.")
Supplies
- Celery with leafy tops
- Clear glasses
- Water
- Food coloring
The Celery Science Experiment

N poured water into three glasses. about 3/4 cup in each.
 soak up food coloring in this colorful science experiment: A Scientific Experiment with Celery and Food Coloring.")
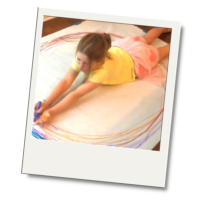
Then she added a few drops of food coloring — 5-8 drops, but who’s counting! — into the glasses and stirred with a piece of celery, which was left in the glass. And then we talked about what might happen if we left the celery in the colored water for a while.
 soak up food coloring in this colorful science experiment: A Scientific Experiment with Celery and Food Coloring.")
We oohed and ahhed over the lava-lamp effect of the food coloring as it hit the water.

The Scientific Method: Make Predictions
We started off with red, yellow, and green, but N really wanted to mix colors and added blue and red to the green water (far right). We revisited our earlier discussion and made predictions about how the celery might change.

While waiting for something to happen, I chopped the celery heart off the bottom of the stalk and set up a printing activity.

N humored me by making a few prints and then asked if she could play with colored water. Totally!

While I only have one photo of this, it was probably the highlight of the afternoon.
 soak up food coloring in this colorful science experiment: A Scientific Experiment with Celery and Food Coloring.")
When we checked the celery a couple hours later, this is what it looked like. I put a leafy top next to it so you can see how subtle the change is. Hmmm. While I could see the change, I wasn’t sure it would make a big impact on my daughter. And then I realized that I should have just put the leafy parts in the water for a more dramatic result. Done!
 soak up food coloring in this colorful science experiment: A Scientific Experiment with Celery and Food Coloring.")
A few hours later the blue/green had the most pronounced shift, but the red and yellow were visibly different too.
 soak up food coloring in this colorful science experiment: A Scientific Experiment with Celery and Food Coloring.")
Here’s a side-by-side comparison of the red and blue-green died celery tops, about 16 hours after the stalks had been sitting in the water. N seemed to appreciate the difference, but wasn’t nearly as impressed as her dad and I were.
Why does celery absorb food coloring?
In terms that preschoolers can understand…
Plants need water to survive and they draw water up from their roots through their capillaries. The capillaries are hollow and act a lot like a straw. Adding color to the water helps us visualize this usually invisible process.

I did this activity with my boys using Queen Anne’s Lace, and this year it’s probably good timing to repeat it with my daughter. Queen Anne’s Lace has small, delicate white flowers in a cluster, so the effect is noticeable and pretty. (Also, another name for Queen Anne’s Lace is Wild Carrot–the scientific name is, I believe, Daucus carota–and if you pull one up by the roots you can see how the root resembles a carrot–it smells a little carroty too).
A big hit with my boys when they were younger was comparing the melting rate of ice cubes. We put one on the counter, one on the fridge, and one on the deck, and then we observed them and wrote down our observations, every ten minutes or so.
LOVE the idea to use this flower!! Thank you for that tip!
Queen Anne’s Lace would be an incredible way to do this activity — so rewarding and bright once it soaked up the color.
Your ice cube melting idea reminds me of a chocolate melting experiment I did in the 6th grade – put one bar in the trunk of the car and one on a hot sidewalk. I lived in LA, and I think they melted at the same rate! Ha.
Good idea ! I have old celerys and we move in 1 week. Time to use them !
Good thought — no need to cart celery along on the move. Good luck with that! I hope it’s smooth and stress-free.
This is one of our favorite things to do! You have to be sure to use A LOT of food coloring to turn them faster. 🙂
One of our favorite things to do is to make rainbows! We actually enjoy doing it so much and with so many different mediums that my daughter made this her Science Fair project. She entered at her school (she is only in Kindergarten, but she takes some 2nd grade courses so she had the option to enter if she wanted) and she took 1st place in the K-2nd grade category!!!! All these little projects instill in them a desire to learn, and grow! So many people think I am wasting my time doing these things every day and yet she remembered our foray into rainbows so much that she turned it into a prize winning project! (all of which she did at school under the watchful eye of her teachers so that it couldn’t be said that anyone’s parents did their projects for them!!)
Oh, Michelle, this is so fabulous. When we create an environment that supports creativity and critical thinking at an early age, we set children up for a future of independent thinking. It’s awesome that you helped your daughter follow her interests from such a young age. Do people really think you’re wasting your time? Send them my way if you’d like 🙂
Looks like your daughter N had great fun! You are setting your daughter up to be a great scientist/artist!
Love to see how you make everything look so amazing to do! You should write a book with all these experiments and great photography! I would buy it!
Hi Melissa ~ You’re the best! I’ll direct all potential publishers to this post to read your comment 🙂 I’ve always been a visual communicator, and find that sometimes pictures tell a better story than the words I might choose.
It can be a bit tricky with science experiments sometimes to know which ones are going to impress your children. My kids’ favourites are ones where you mix things together – like seeing what things will dissolve in water, bicarb and vinegar volcanoes and different kinds of slime.
I wrote about our most recent science experiment, using marbles to explore inertia, this week at http://adventureskids.blogspot.com/2011/04/inertia.html
That is SO cool. I’ll be bookmarking that for when my little ones are a bit older. Your blog is great — thanks for sharing!
Thats a fantastic idea… love such fun learning tips:)
Thanks Roopa 🙂
thank you help me with my science project thank you.
Next time I buy celery, we are going to have to try this. I think my son would really enjoy seeing the change in the celery.
I bet he would! I always buy it for a stalk or two, and find that I usually have too much left over. Very frustrating, and clear that I need to find more celery-rich recipes!
Who woulda though celery? I always have leftovers from the bunch – no one seems to like to munch on them over here. I guess a science experiment will be in the future.
Aren’t the simple parts of the activity always the funnest, the ones that you didn’t plan?
Thanks for supporting It’s Playtime this week, I hope to see more of your ideas, as I always do, next Thursday too!
Jamie @ hands on : as we grow
it’s so true that the unplanned parts are almost always the most enjoyable…probably because they’re spontaneous! Look forward to your next Playtime 🙂
I did this experiment with my nearly-3-year-old daughter last week. The Usborne book I got the idea from suggested cutting the bottom of the celery stem in half and standing each half in a different colour food colouring. This leads to a lovely 2-colour-effect stem, with the leaves on each side of the stem being a different colour – it even interested my daughter!
Angela! That is such a cool idea…and now I’m kicking myself for not thinking of it 🙂 We will have to try that next time. Thanks for sharing1
Love the concentration on N’s face as she is pouring the coloured water. Gorgeous 🙂
Thanks, Christie! The concentrated looks always help us know when a project is going well, no?
Oh gosh, this takes me right back to childhood – this was one of our favorite experiments at home growing up. Â We could get the celery really bright red and thought it was sooooo awesome!
This is sooo cool, I will be doing this with my little girl for sure.  You can also do the same thing with daisies :DÂ
This is so fun because there are so many different things all in one! The color changing, te playing with coloured water and stamping with the base! I’ve only done this with carnations, which is fun, and pretty – you can even split the stem and put each side in a different cup and get a two-tone flower! I guess it’s similar to the queen Anne’s lace idea, we just don’t have that near us!
we did this, it was a hit in our house!
http://alessandrahayden.blogspot.com/2012/06/celery-experiment.html
I did this experiment with my KG daughter today. I like your idea of using the cut off heart as a stamper. I usually pull my stalks off, but today, I decided to just cut the whole end off and it was so pretty – looked like a flower!
When I was in school, we did this with white Carnations. I also saw a similar experiment where you take the Carnation and split the bottom of the stem into four. You take each piece of the stem and put it in a differently colored cup of water, and it makes a rainbow-looking flower when it’s done. 🙂 Pretty sweet.
Organized content is the best way to display or post an article, thank you for making it easy to digest your
Saw a little one do this with a carnation. She split the stem into 4 parts and put each part into a different color and ended up with a rainbow flower!
I LOOOVEE THIS
[…] Source […]
[…] des tiges de céleri aux couleurs vives? Découvrez cette expérience scientifique à partir de Tinker Lab pour un comment! Non seulement votre enfant éblouira avec sa nouvelle capacité à transformer le […]
What are the variables in this experiment
(Independent, Dependent, and Control)
[…] different but Tinkerlab has a brilliant activity where celery draws coloured water up through its […]
[…] How Does Water Move Through Plants? |TinkerLab […]