Have you used gloss medium before? It’s a clear acrylic paint that is great for sealing two-dimensional projects.

I was cleaning out the laundry room and came across an old bottle of acrylic gloss medium and varnish. Have you ever used this stuff? It’s awesome! It’s essentially glue wrapped up in a paint bottle, and so easy to apply with a paintbrush. And when it dries it leaves a beautiful, unifying glossy finish that makes everything look purposeful.
I also have a stash of laminate and wood pieces that I thought would make a good substrate for this project. I let N go through the pile and choose the ones she wanted. You can see her two choices in the picture up there.
Materials
- Acrylic gloss medium. I also like matte medium, but the final look is obviously different.
- Wood, linoleum, cardboard or some other sturdy surface to collage onto.
- Paintbrush
- Collage papers: We used aluminum foil and bleeding tissue paper
- Scissors
- Bowl for the gloss medium
- Glitter

We put the materials out together, and N wanted to cut the aluminum foil. I showed her how it’s easily torn, but she loves cutting. It’s very empowering, and I guess foil is pretty fun to cut.

While she worked on the aluminum foil, I started cutting the tissue paper. Why, I don’t know, since she wanted to do that too. I should know better.

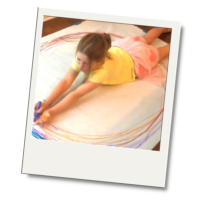
Once it was all set up, she began painting gloss medium on the laminate…

and sticking papers onto it. We talked a bit about layering and composition, and I used language like, “You’re layering the yellow paper on top of the blue paper” and “I see you chose to put the red piece vertically, next to the green piece.” It’s the teacher in me, for sure, but language like this also helps build vocabulary and contextualize the process.

Once her fingers got a bit gooey, some of the pieces stuck to her hand and she realized she could ball them up and stick them down in a new way.

And then she spotted the glitter and came up with the idea of shaking it right into the medium. Bravo!

And oh my goodness, the party just began! This got goopy and gluey, and the middle layer got higher and higher. I can’t even remember how many times she asked if she could add more medium to the bowl.

Once dry, the medium is completely clear, allowing all of the colors to shine through. I’m really excited about this piece, and love that it was created on a more permanent substrate…perfect for hanging. It feels substantial and archival and I’m thinking it could be a pretty nice father’s day gift.
What are your ideas?
This post is linked to It’s Playtime

I LOVE IT!!!! My youngest would have a blast with this!!
Thanks Michelle! I had fun with it too — it’s not just for kids 🙂
Ever done photo transfers with acrylic medium?
I have! In fact, I think that may be why I had the medium in the first place 🙂 Thanks for reminding me about that — that would be fun to try with N when she’s a bit older. xo
I love collages! They are so fun and messy. Have you thought about posting this on the “It’s Playtime” link party? Here is the link if you want to. http://messypreschoolers.blogspot.com/2011/04/its-playtime.html
Oh yes, I will post it right away. Thanks, Rachele.
The end result is really great! I love the teacherly way in which you chatted about what she was doing. It’s really neat to see how she naturally discovered things she could do. Love that you let her lose to do her own thing and then empowered her as she did it. What a great art lesson!!
Thanks for picking up on that, April! I do try to give her the freedom of exploration as much as possible. And the results of this method are starting to pay off! When she has a visual idea, she’ll scoot over to her art table and get what she needs to make her ideas happen. In my book, this is the best strategy for fostering independent thinking and confidence. Cheers!
I was going to do a similar activity (in the future) like this! The foil is the background though! I like the idea of the acrylic medium.
You know what’s funny — my original idea was to paint on the aluminum foil (we’ve done this before), but I abandoned this at the last minute. Great minds think alike!
Beautiful indeed! I’ve never used that acrylic medium, I’ll have to see what that’s all about! Foil would be a great material to learn to cut with – since it pretty much tears on its own…
Thanks for linking up again this week at It’s Playtime!!
Jamie
I love the finished product! And am amazed you got the tin foil to stick! Mine never lasts on the project.
I just found this, and did it w my 3 yr old yesterday. I started by letting her paint her canvas board and also let her collage in photos of our family I printed and put on jewels as well…. It looks amazing! Thanks for the inspiration!
Hi Marnie, That’s such a good idea! If you have a photo, feel free to attach it to a comment. Otherwise, it sounds amazing. I’m going to have to collect some photos and bits & bobs for the next time we try this.
Rachelle, this is gorgeous! I am adding this to my cart for my next school supply order (from my favorite Canadian School Discount Supplier;)!!!
Then, I’m searching our shed for something more permanent to collage on for LO! That is one medium we haven’t used yet! I had one question about another type of material I’d like to use with the kids but, I am not sure I should. Is there a direct email address you might have where I’d receive a response (on your time of course).
My kids love that activity! But I actually put PVA glue in poster paint so they can paint first, then they can glue tissue paper, matchsticks, craft sticks etc and sprinkle glitter on top. The last one we made is on the wall: I taped a long sheet of aluminium foil on sturdy craft paper and they went for it like mad