Since my daughter (now almost 3 y.o.) practiced hammering with golf tees back in October, I’ve been waiting and waiting for just the right time to introduce her to REAL nails! After working really well at piercing gumdrops with toothpicks, I had a feeling that the time had come. So I dusted off an old scrap of wood, pulled out our jar of random nails, and threw in a bag of rubber bands just to make it more interesting (inspired by this post at Jojoebi).

We used the hammer from our Melissa and Doug Take Along Tool Kit, and it worked surprisingly well. I gave her a small safety lesson, where I demonstrated how to hold a nail low…right down next to the wood. She was so eager to get to her task, and was fiercely focused.

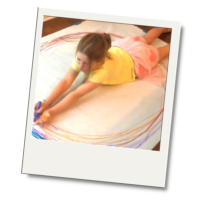
Once N decided that enough nails were hammered in, she began adding rubber bands. At first there seemed to be an unspoken rule that each nail would be surrounded by one rubber band layer.

And then the rubber bands kept on going around and around the nails. I love all of those colors!

For my friends out there who want to avoid a mess, this is as clean as projects get, and all of the materials can be reused when your child is all done with their nail and rubber band exploration.
If you have a rubber band project that you’d like to share with the TinkerLab community, you’re welcome to share a photo or a link here: Creative Experiment #4: Rubber Bands

Wonderful! I think both of my kids would love this activity.
Would you recommend any certain type of wood or nails?
Good questions! I used whatever I had in the jar, but in a more perfect world a big flat head nail would be a better bet than a finishing nail (since it’s got more for the little hand to hang on to). Trilby just made a comment about using roofing nails — and that makes good sense to me. And a softer wood would be better than hard, but again, I dug into my recycling pile.
Rachelle, I’ve been waiting to practice hammering golf tees ever since I saw your post back in October. I think it is a fabulous idea and J is almost ready. I think using real materials is always better than a toy version made for children, so I don’t see anything wrong or dangerous at all with N using real nails. Actually, I think it leads into so many other wonderful practical and creative skills.
I do love the rubber bands, they have a name, the boards, but I can’t think what it is. We use to use them when I was teaching and the kids always loved them.
Oh, I totally agree Kate. Real tools are wonderful and it’s just a question of “when” rather than “if”. I’m sure you and J will get a lot out of this when the time comes.
the boards for rubber bands are called geoboards. You can buy plastic ones from lakeshore or somewhere like that, or make them. Pine is a soft wood and easy to come by; you wouldn’t want to use a hardwood for this activitiy. Safety goggles make this seem like an even more important and dangerous activity, adding to the fun, and also of course adding another layer of safety. You can get small metal hammers and safety goggles at the dollar store. Roofing nails are short and have a big head; easy for little kids to hit. If you pre-drill, or even pre-nail (then pull out the nails) it gives the kids started holes, which make it easier at least at first, for them. Also, if you put a folded towel or two on the table under the block of wood it muffles the noise a bit, better for in the classroom 😉 Can you tell I’ve done this activity? With special needs preschoolers, no less….and they love it! Great fine motor/coordination/OT practice!
You are fabulous! Thanks for sharing all of these great tips. I can see why you’d want to be thorough and careful in a classroom setting, and so half of these things never occurred to me. I think I need to pick up some safety glasses just for the fun of it, if nothing else. And the towel would be perfect for hammering during little sister’s naps. Your students are very lucky to have you!!
Great tips! Thank you!!!
Awesome idea! Love it!! We didn’t build anything today, just made a Memory game!
What a wonderful idea! Thanks for sharing!
Don’t forget to teach the children how to take out the tee with the claw on the hammer. That activity is also fun for them.
I work with children doing enrichment and tutoring and when I have the youngest children, I use styrofoam and golf teas to teach hammering the first time. It works well. Kids love it. I get the large pieces that t.v’s and large things come in. Try it with 2 and ups.
oops.. golf tees
Okay now you have me really excited!! I have a tool loving little 32 month old at home that would just LOVE this…I also love the golf tees idea and am off to go dig-out my husband’s old golf bag tomorrow 🙂
I will definitely let you know if I do this and blog about it! Will link back here for sure!
Georgia
You have answered my question. I have wood, nails, and a small (real) hammer. I’ve been trying to figure out if I should pre-hammer in some of the nails, or show my son how to do it. I’m glad I’ve run across this! Thanks for sharing!
Rachele @ Messy Kids
I bet your son would be able to handle this, Rachele! Good luck, and have fun.
here
Hammering (real) Nails | TinkerLab