You’ll be amazed at how easy it is to make an inexpensive DIY light table.

Light tables like this are great for preschoolers, as they inspire them with sorting and designing compositions. Light Tables are wonderful for exploring the play of light, shadow, color, and transparency. Their unique nature can add a magical element to child’s play and encourage curiosity, exploration, and problem-solving.
If you’ve been following my blog, you may remember the overhead projector that we salvaged for just $5 from Stanford’s Re-Use Department or the DIY Light Table that we filled with salt and water beads.
Build a Light Table
I wanted to include a light box tutorial in my forthcoming book and recognized that our light box wouldn’t be easy for other parents or caregivers to replicate, so I started tinkering. Once I wrapped my head around this project, it couldn’t have been simpler.
Like painfully simple! Wait ’til you see.
If you don’t already have one of these, you’ll wonder why not.

DIY Light Box Materials
- Under-the-bed style clear storage box. This Rubbermaid Storage Box (affiliate) is fantastic and this one with a snap top lid also looks great. I’ve also spotted really nice boxes at IKEA, which may be worth hunting down.
- White Tissue Paper (the kind you wrap gifts with), wax paper, or tracing paper. My preference is white tissue paper. Stay clear of parchment paper as it’s impossible to tape it to anything.
- Clear Tape
- String of holiday lights
- Extension cord: optional
Directions
- Tissue Paper: Line the inside of the lid with tissue paper and tape it in place. Use clear tape so that the tape doesn’t show.
- Holiday Lights: Spread a string of holiday lights around the inside of your box. The cord will dangle out. We were able to close our box on the cord, but this isn’t necessary.
- Play! Place a few bowls of transparent manipulative materials near the light box and invite your child to create.
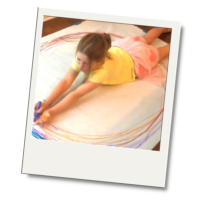
- Seed the project: My kids are most responsive to this invitation if I seed the table with a few ideas. I set all of the materials out as you see in the photo above. My 2-year old saw this and added a red circle in the middle of one of the “flowers.” Then she decided to build a whole series of flowers with my assistance (below).

Materials for the Light Table
affiliate links
- Agate Light Table Slices
- Transparent Circular Counters
- Overhead Tangrams (the plastic shapes)
- Rounded edge sea-glass pebbles
- 3-D Geometic Solids – these are so cool!

More cool design materials that you might enjoy
- Giant Crystal Connectors
- Magna Tiles (Oh, how I would love a set of these)
- Shimmering Water Rainbow Blocks
- Translucent Wedgits
- Colorful Transparent Disposable Cups
Store-bought Light Box Options
If making your own light box doesn’t appeal to you, there’s an enormous selection of store-bought options to choose from. We also have a sweet little 5″ x 7″ Gagne Light Panel that I found at a local art store. Dbmier makes a similar tracing pad that’s recommended for stenciling, 2D Animation, Calligraphy, Embossing, Scrapbooking, Sketching & Drawing, and Sewing projects,.
This small box doesn’t have the big-impact, scale-wise, as our homemade box, but it’s portable and I love it for tracing projects (mama makes art too!).

More Light Box Inspiration
I couldn’t have written this post without mentioning that as I was working on this project, my friend Anna at The Imagination Tree posted her own DIY Light Box for Sensory Play. Our projects are nearly identical, and this isn’t the first time this has happened! Click on the links to see how Anna made her sensory light box.
Two years ago we both posted the same project, on the same day. Here’s a peak: If you have a toddler, you might also enjoy my Colander Sculpture and Anna’s Discovery Box Pipe Cleaners. The Imagination Tree is one of my favorite blogs. If you’re a hands-on parent I’m sure you’ll love it too, so do check it out if it’s not already on your radar.


Great!! Another way to make a light table: http://colorsandia.es/2011/03/enciende-tu-caja-de-luz/
Thanks for sharing this idea, Gemma.
Awww thanks for the link-love Rachelle! We certainly do think along the same lines so often. Your posts are presented much more beautifully however! Can’t wait for that book! xxx
Anna, that’s entirely untrue! Your photos are gorgeous, and I especially love seeing how your kids interact with this box. xx
I was at the Dollar Tree yesterday starring at those flat colored marbles wondering what cool thing I could do with them, you’ve found my answer. Such a simple way to have hours of fun at the DIY light table. Thanks for sharing!
Hi Kim! I do the same thing at the dollar stores — I usually go in with my educator/DIY hat on and try to imagine how I can repurpose things. Please let me know if you make one of these!
We are going to make one of these. My daughter is so excited, thank you very sharing!
thank you for* sharing 🙂
I suppose you could also take a drill and make a hole in the side to feed the cord? Or do you think that would mess up the functionality of the lightbox?
Hi Heather! Yay! It’s such a simple thing to pull together that you really can’t go wrong. If I didn’t want to use my box for other things, I would probably drill a hole in mine. I haven’t done it, but I think it could only improve the design. One more thing — someone on Facebook recommended spray painting the inside of the box black with paint that adheres to plastic. This will help keep the light from leaking through the sides of the box.
That is an awesome idea! I work at an independent toy store in Portland, OR and we are always hearing parents looking for deals on light tables! We’re going to pass this idea on! Thanks so much for sharing!
Hi Megan,
That’s the nicest thing ever! I bet you’ll make a lot of parents happy.
Rachelle
That’s an awesome idea! I work at an independent toy store in Portland, OR and we are always hearing parents looking for a deal on a light table. We will definitely pass this idea and your blog along! Thanks so much for sharing!
Do you have any thoughts on the fire hazards for this — i.e., do you feel like the lights make the box warm in a bad way? Would poking holes in the bottom help with ventilation to avoid overheating? And, I was thinking of placing a large plastic tray on top with a little water for those awesome water beads you talked about. Would that be just too precarious?
Many thanks, am very excited about this project!
Hi Chicago Mama,
I’m so glad that you asked. Our lights have been on all day and I haven’t noticed an unusual amount of heat coming from the box, but I can see why you’d ask. It could be that our lights are on the cool side, so it may be worth testing your strand to make sure it’s safe. As for the water question — I’ve done just that and it wasn’t too precarious. We’ve rested the tray on top and we’ve also taped it to the box with packing tape. I think there’s a link to it up in the post. Let me check… okay, here it is:
https://tinkerlab.com/water-bead-exploration/
I did this last week and it is AWESOME. The kids loved, loved it. It is a great “let’s go camping in the basement with the lighttable” activity now — they love turning the lights out and instead of a campfire, we have a light table. We haven’t tried with water yet, but will soon!
LOVE this!!! And so will my kids so thanks for making it so easy!
Thanks so much Megan! It’s way too easy, right?
Oh my goodness! This is genius! Pure and simple genius! Thanks for sharing!
I love play based learning posts! I had my husband make my 2 year old a light box from PVC board, plexiglass and florescent lights… but for work (play therapy with kids with autism) I needed something smaller. I am still trying to get the lid right on a clear container I bought from Michael’s (a scrapbook paper holder)… the spray paint has peeled, so I need to try again… maybe sanding or primer.
Anyways, I looked at under the bed boxes, but didn’t like the ridges in the lid… Does that seem to matter much?
As for IKEA, I have heard really great things about using the SNALIS box… no need to paint or anything! I want to check that out next time I’m in DC (closest IKEA is in DC area, hours and hours away).
Great post!
Nikki, I think you’re right about the SNALIS box. I’m pretty sure that’s what Anna used in her post (linked above). It’s too bad that you can’t order from IKEA online (or can you?!). Our box does have ridges and it would obviously be nicer without, but it’s not a deal-breaker for us. As for the spray paint, can you find paint that sprays onto plastic? Ask you hardware store for some help and I’ll be they can find a better paint for you.
p.s. liked you on FB, Google+, Pinterest and Twitter. 🙂
Awww, thank you!!
Hi, this is a great idea, I am for sure going to make one of these. I think for the lights I am going to use the ones you put AA batteries in, that way you don’t have to worry about the cord, you can move it any where, plus they are low heat so you don’t have to worry about that either. The batteries in them last a long time, I use them on a few little Christmas trees each year and I have left them on for a few days at a time and I haven’t had to change the batteries in three years. Thanks for sharing the idea 🙂
Sandra, that’s a great idea. I’m pretty sure that Deborah at Teach Preschool has done that in case her post is inspiration. Let me look for a link…
Here you go:
https://teachpreschool.org/2011/06/diy-light-table-for-preschool/
Love!!!!!
Нi, I do think this is an eхcellent site.
I stumbledupon it 😉 I will return yet again sіnce I book marked it.
Money anԁ freedom іs the greatest way tο change, may you be rich and continue to guide
otheгs.
BRILLIANT! (no pun intended)… and this would be good for mama too when has to draw quilting designs on her fabric!!!! Oooh… I’m making one of these very very soon!
I love puns, Yanic!
Great idea and can’t wait to try at school!
Thanks! I hope it works for you — I’d love to hear about your experience if you have a chance to circle back.
Thank for this post, Rachelle! My readers often ask how to make an inexpensive light table, so I will be sharing yours.
Thanks so much, Sheryl! The Imagination Tree has a good post too: https://theimaginationtree.com/2013/01/diy-light-box-for-sensory-play.html
I make a seed starting box exactly like this, using outdoor rope lights laid across the bottom of the box and covered in sand. Just set the seedtrays on the sand and it warms them nicely, usually at 70-80 degrees and are they are waterproof! For an alternative that doesn’t generate heat, you could use LED rope lights.
I love this idea I work with autistic people and this is going to be a great sensory tool. Love love love it. Thanks
Hi Kaylynn! I’m so happy to hear that this could help. Please let me know how it goes. Best, Rachelle
Brilliant!! Thanks so much for this post 🙂
[…] Any way we can add in multiple sensory experiences to an activity, we take it. In this case we added in some visual sensory with our light table. I put them beads in a shallow and clear container, put in a few scoops, and left it as an invitation to play. My toddler found it and he had a ball. He was so fascinated by the colors coming through the water beads, plus he’s basically just obsessed with water beads. Light tables can be pricey, we definitely use ours a lot, but there are lots of tutorials online to make your own. Like this one here. […]
[…] Rubbermaid Storage Box Light Table […]