Marbleizing paper is a gorgeous craft that will awe even the most jaded maker. As a child, I always wanted to know how to marble paper. Kids and adults adore this magical technique. Today we’re using special inks that really simplify the process. I know you’re going to love this!
The process used here is suminagashi. What’s the meaning of suminagashi? The beautiful word translates from Japanese to mean “spilled ink.” I love saying suminagashi, and hearing my kids try to say it is a-dorable. Suminagashi is traditionally done with Sumi Ink, which is oily. Since oil floats on top of water, guess what? So does the Sumi ink!

Marbled Paper Supplies
Note: Post may include affiliate links
- Suminagashi Kit
- Card stock Paper
- Stick to swirl the ink (popsicle stick, straw, coffee stirrer, etc.)
- Casserole Dish or similar to hold water
- Water
- Drying area
How to Marble Paper
The process is simple and beautiful. I’ve been saving this Suminagashi kit for a quiet morning and it was a true winner with both my 2-year old and 4-year old.
Although the kit is recommended for ages 6 and up, both of my children handled the dyes well. My 2-year old needed a little help, so I wouldn’t let the age thing stop you if that’s a concern.

Step 1
Squeeze a little bit of color into a tray of water and swirl it around. Color mixing is okay!

Step 2
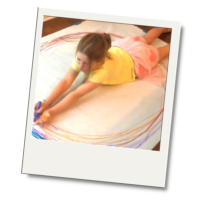
Gently lay a piece of paper on top. Leave it for a second, pull it off, and you have a print.

This is one of those projects that’s tough to stop at just one. Because each print is unique, it’s compelling to try multiple variations on the theme. This kept us active for a good hour! Once dry, my 4-year old turned these beautiful marbled papers into cards for her teachers.
More Suminagashi
If you’re interested in another version of this experience, we did some marbling experiments a couple years ago with spectacular results: Marbleized Paper with oil and liquid watercolors.
Inner Child Fun shows how to make gorgeous concentric circles — I wish we had tried this ourselves. Next time!
The History of Suminagashi
Oder this book, How to Marbleize Paper if you’re interested in learning how to make 12 traditional marbleized patterns

We have this kit and love it, too! One go around, we marbled some marker drawings to give the drawing a background (http://notsosahm.blogspot.com/2012/08/purple-haze-japanese-suminagashi.html). It would be neat to do it in reverse too — pick shapes out of the marbling and outline those in marker or use the marbled paper as a scene on which to draw. Looks like you had fun!
Picking shapes out of the marbled paper is such a great idea! We have a few extra sheets, and I’m going to carry them in my bag for the next time we’re waiting in line or at a restaurant. Thanks for the idea!
How lovely and oooh this kit has been on my to-try list too!
Roopa — after working with it, I can say that we barely used any of the ink to create at least 50 card-sized pieces. It’s a really great product for kids and I doubt you’ll be disappointed. ~rachelle
I have done this same sort of project by whisking oil and food dye then dropping it in a cookie sheet filled with water. It probably isn’t as beautiful or permanent as this Japanese kit but it’s easy and cheap. I love the the inspiration regardless.
Hi Lisa,
We’ve done the same thing. I think I added a link to it in this post? If not, I should! Both are fantastic ways to explore marbling.
Cheers,
Rachelle
The further I read, the greater your material is.
[…] https://tinkerlab.com/marbled-paper-suminagashi/ […]
[…] to play these offerings for real money by registering an account with a reputable online casino (weblink). Once a person has registered a real account, they will be required to provide the website with […]
[…] you will be able to treat yourself by using a Mobile Casino that has been produced just for you (this contact form). Whether you are entirely new to the gambling online casino or you are a seasoned expert who is […]