Shrinky Dinks!
I just learned that these polystyrene plastic (#6) sheets were invented by two housewives from Wisconsin in 1973. Weren’t they smart and industrious! I’ve been told that you can make your own shrink plastic projects with #6 plastic, and I’d love to hear from you if you’ve tried this.
 We made Shrinky Dinks a while ago and my 3 year old requested them again the other day. This is such a fun project, and a perfect indoor activity on a cool Fall day. Although it happened to be about 90 degrees when we did it. Fall in California…go figure. We set ourselves up with a sheet of Shrink Plastic, Paint Pens, and Sharpie Markers. You’ll find that Shrinky Dinks can come in all sorts of themes, but I wouldn’t bother with that. I really like the Shrinky Dinks Refill Set of 6 plain 8″ x 5″ sheets. Nothing fancy, but they work!
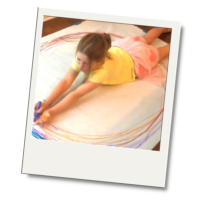
I set this up on our plastic-covered table and opened the windows since we were using stinky, non-washable pens. I also placed the shrink plastic on top of a sheet of white paper so that N could clearly see her work. All of the drawing happens on the rough side of the plastic, and you’ll want to avoid using oil-based crayons and pencils because they can catch fire in the oven. Yikes.
Rather than draw on individual pieces, I thought it would work best for my little one to draw all over the big sheet before we cut it up. N added all sorts of lines and shapes, but left a lot of white space. We talked about how the plastic would shrink the whole thing down and that we’d see more of her designs if she filled more of the sheet with marks. She understood the point, and found a way to fill that space…with dots. I love it!
 She cut the plastic up into three organic shapes, and then I punched one hole in each of the pieces so we could turn them into necklace charms.
 After she cut them out, I placed them on aluminum foil on the lowest rack of a 350 degree oven. They start to curl and shrink. Once they flatten, after about 2 minutes, pull them from the oven and wait for them to cool.
I wish I had a good picture of one of the charms around my neck, but I’ve noticed that while I’m really good at documenting each step of our projects, I’m terrible at capturing the final result. Something I need to work on, for sure. But, at least you can see them as they came out of the oven, all shrunk up. I think they’re adorable, and my daughter enjoyed the process.

Thank you for a fun afternoon, clever Wisconsin Housewives!

It is amazing that housewives invented shrinky dinks! Now I need to invent something! I remember having a shrinky dink “Ernie necklace” (My fav character from Sesame street) that my brother made me when I was about 5 and loved it! I made a mobile a few years ago with this shrinky dink material and was fascinated once again! I need to revisit this again with my daughter since I know we have some sheets in my art stuff somewhere! Thanks for the tip about the #6 plastic.
Yes, Melissa, you can do it too!!! Can’t wait to see what you come up with.
I loved shrinky dinks as a kid. Still do!
Yay for shrinky dinks!
http://www.childcentralstation.com/2010/08/shrinky-dinks.html Here is the link to our experiments with shrinky dinks. I have been unable to have a successful shrinking experience with anything other than the purchased sheets. Although, it has been quite some time since we have attempted any! Thanks for the reminder :).
Hi Amy,
You rock! I love how you took this one step further to compare the #6 plastic to the shrinky dink material. Super interesting and I’m sure this will be helpful to others considering this experiment too.
~rachelle
Check out this website
http://mylifeinthenuthouse.blogspot.com/2011/06/rainbow-suncatcher.html
I used it as inspiration to create materials for the preschoolers I teach to work with on the light box. My 9 year old son saw what I was doing and took it in a whole new direction…which I love! Just make sure you work in a well ventilated area. Here is a photo of his artwork.
Heather — this is super-clever too! Never would have thought of that, and maybe we’ll give this a go next time we have a bounty of plastic cups. For some reason your photo didn’t link up. I found it, but I’m having trouble linking up right now. Will work on it and add your image when I figure it out.
We are always looking for new “tools” to add to our art belts. I didn’t know you could buy the sheets plain. I am adding this to our Christmas fun list. Thanks for the tip!
what a great gift, zina! the plain sheets are wonderful — just like drawing on paper, and not at all prescriptive. glad to be here to inspire creative experiments for kids 🙂
i’m such a shrinky dink fan… but just of the blank sheets that you can decorate yourself. like N did here. such a magical process to watch them roll up and then flatten – and, well, shrink. we made necklace pendants out of shrinky dinks for N’s 4th birthday party as gratitude gifts for the party-goers, and we also made fun tags for our herbs with them. (one of these days, those posts will be back up on my blog. 😉 ) of course, the tags far outlasted the herb plants, and are now lonely in a drawer in my kitchen. alas, i do not have a green thumb.
you can make your own shrinky dinks from #6 plastic (like the clear plastic from salad bar containers) but i’ve not tried it yet myself. i saw it on the skip to my lou blog here: http://www.skiptomylou.org/2009/01/07/how-to-make-shrinky-dinks-with-recycled-6-plastic/ and also a really pretty suncatcher on inkstitch last spring made from plastic cups: http://www.inkstitch.net/inkstitch/2011/03/recycled-spring-sun-catcher/
Jen! Thanks for the link to this #6 plastic project — so good to know that it can work. The main difference, I think, is that I’ve been reading that the #6 plastic off-gasses, whereas I didn’t notice that with the shrinky dinks. Maybe this makes a case for buying the original and steering clear of DIY…just this once.
I have heard of shrinky dinks but we’ve never tried it. It looks neat!
Popping back into this post to say that I was in a science/toy store the other day, saw some blank sheets, thought of you (& those housewives!) and bought the last package. It’s in the gift closet, but I’m undecided whether I’ll keep it until Christmas or not. I might be tempted to take it out sooner!!
I’ll be back to explore these links in the comments before we experiment! Thanks for encouraging people to leave their links behind. 😉
I’ve made my own shrinky dinks with #6 plastic (take out containers)…they melt flat, so don’t worry about the rims or details in them. Use permanent markers (although, I am going to see if colored pencil will work if I rough up the plastic a bit first). So easy – my 9 year old niece and my 3yo daughter both loved doing this together!
here is a link on how to make your own:
http://www.curbly.com/chrisjob/posts/2252-diy-shrinky-dinks