TinkerLab

join button

join button
  • HOME
  • ABOUT
    • ABOUT
    • FAQ
    • CONTACT
    • PRIVACY POLICY
  • ACTIVITIES
    • ART
    • SCIENCE
    • SENSORY
    • BABIES
    • TODDLERS
    • PRESCHOOL
    • ELEMENTARY
    • MONTHLY ART CHALLENGE
  • SCHOOLHOUSE
    • LEARN MORE
    • MEMBERS LOGIN
  • BOOKS
    • TINKERLAB: A HAND-ON GUIDE FOR LITTLE INVENTORS
    • TINKERLAB ART STARTS
    • CREATIVE ADVENTURES IN CURSIVE
  • BLOG
  • NEWSLETTER
You are here: Home / Archives for Age / Pre-School

Spring Sink Mat Prints

By Rachelle 34 Comments

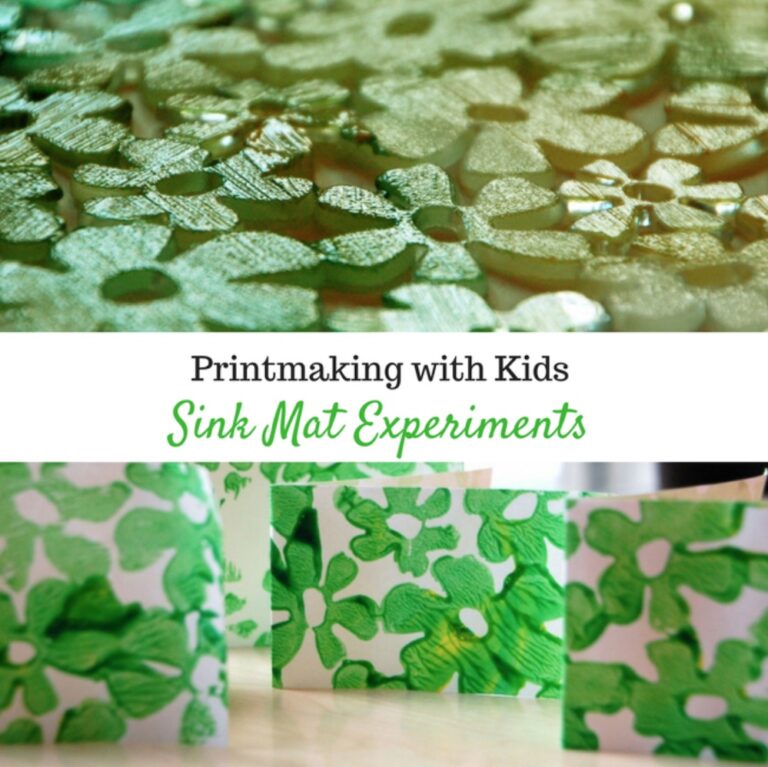
Printing making with Kids - Sink Mat Experiment

Printmaking with kids can be accessible and easy. This simple printmaking activity can be set up for children as young as three, maybe even two if you’re feeling brave!

Supplies:

this list contains affiliate links

  • Rubbery plastic sink mat
  • Washable Poster Paint (my favorite brand)
  • Foam brushes (roller brushes or wide brushes will also work)
  • Paper (I like sulfite drawing paper)
  • Palette (Dinner plate covered with foil)

Printmaking with Kids: Easy Sink Mat Printing

I spend a lot of time at the hardware store. And last week I spotted this flower mat — the Blumz Sink Mat! — I love that exclamation point! — It’s an exciting sink mat! — and it looked like something that could be fun to print with!

In honor of Spring’s inevitable arrival (yes, it WILL get warmer) and St. Patty’s Day (I married a “Doorley”, after all), we used green and yellow paint.

I also found a bag of ten foam brushes at the dollar store, so the luck of the Irish was clearly with me. I covered the work space with paper and then my daughter painted the mat with our fresh Spring palette.

And then we added a sheet of paper, pressed it down with the palms of our hands, and pulled our first print.

Ooooooooh!! She loved it, and I thought it came out gorgeous!

We pulled three prints, which frankly was more than I had bargained for, and then the real fun began! If you followed our Jello experiment, you’ll recognize a common thread here…

And maybe you picked up on the addition of an apron. I love that focused expression.

There’s a leprechaun in my house!

More printmaking art projects for kids

16 Easy Printmaking Projects for Kids

Abstract Recycled Prints

Styrofoam Prints (from a veggie or meat packing tray)

Cookie Sheet Monoprints

Bubble Prints

Filed Under: Pre-School, Printmaking, St. Patty's Day, Toddler Tagged With: green, preschool, print, printmaking, sink mat, spring, st. patty's

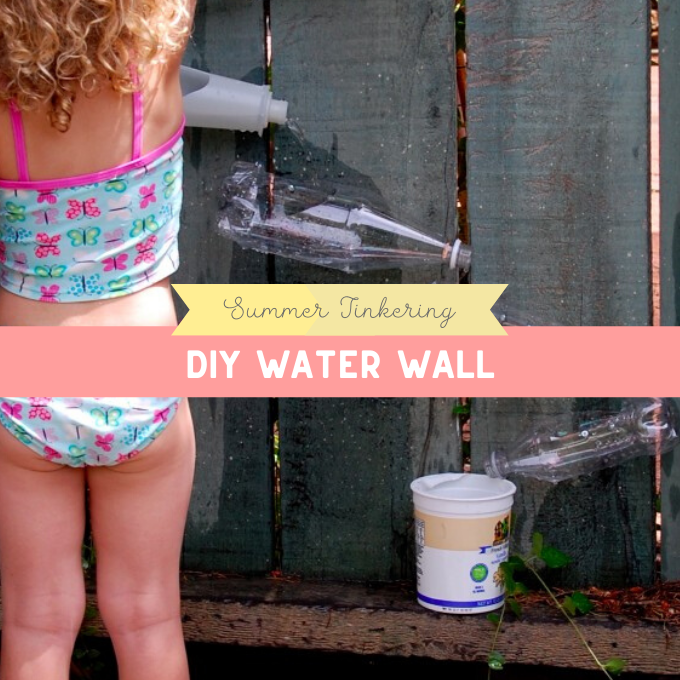
DIY Water Wall

By Rachelle

Does it feel like summer in your part of the world? It’s heating up here, and my kids have been enjoying this easy and inexpensive new backyard water feature. All you need is a nearby water source, recycled plastic bottles, and a wall to attach it to.

My older daughter helped me build this one afternoon last week while my toddler was napping. She loved the responsibility of holding the bottles steady while I drilled and took a lot of pride in our finished water wall. It’s not gorgeous, but it’s a lot of fun and an upcycler’s DIY dream.

water wall build

To replicate this upcycled playscape in your own garden or patio, I’ll break this down into some simple steps.

collection of water wall materials

DIY Water Wall Supplies

Plastic bottles

Screws (our nifty kit is from IKEA)

Drill. The one in the photo is no longer with us. Sniff. However, our brand new, favorite drill is this cordless Makita drill  (affiliate).

Exacto knife. This one (affiliate) is a good deal

DIY Water Wall Steps

With the exacto knife, cut a hole in the side of the bottle. The hole will be large enough for you to fit your hand into it so that you can easily position and drill in the screws.

score bottle and add screws

Using the exacto knife, score an “X” on the side of a bottle and push a screw through the “X” from the inside. Repeat one more time so that you have two screws poking through the bottle.

Screw the bottles to a fence or wall. Tilt them slightly downward to help the water pour through. You might have to shift the bottles around or cut the holes a bit more to make the water wall work properly. Test as you go.

water wall testing

Test it out to make sure it works. Add a bucket at the bottom to catch the water, which can then be added to plants or returned to the top of the water wall.

Invite some friends over to play.

water wall play

Set up a water-filling station and add some pitchers, watering cans, and cups.

And be prepared for eye-opening, open-ended fun.

How to make an easy summer water wall

Filed Under: DIY, Elementary, Outdoors, Pre-School, Recycled, Sensory, Summer, Toddler

Snowflake Collage Activity for Kids

By Rachelle

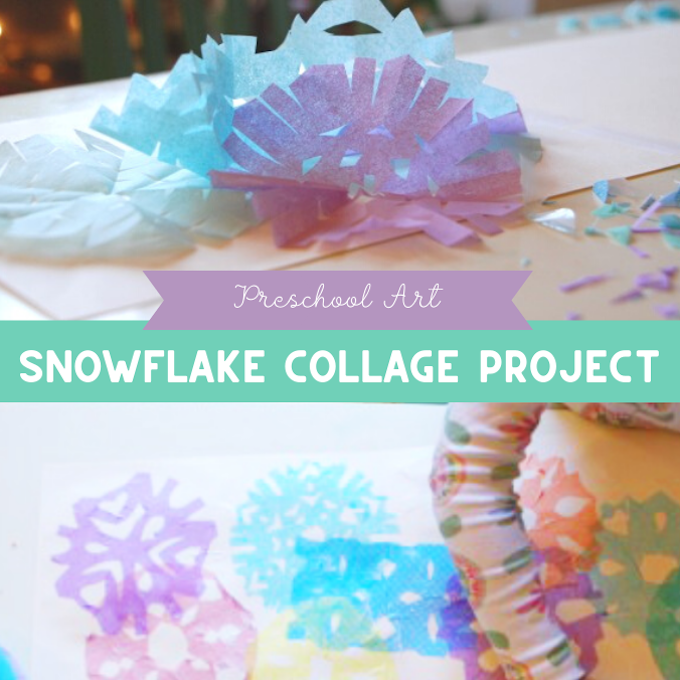
Are you looking for a meaningful process art project to do with the kids this winter? I have an answer for you with this snowflake collage activity for kids.

Have you made snowflakes with your child? Once you get started, making snowflakes can be completely addicting. Last year, when my older daughter was three, we made PILES of snowflakes and this year she turned into a snowflake-making machine about a week before Thanksgiving. The good news for us Californians is that we’ll be knee-deep in snow by December at this rate!

Snowflake Collage Activity for Kids

snowflake activity for kids

Step 1: Cut Snowflakes

There are lots of ways to make paper snowflakes, and my favorite tutorial for easy, good looking snowflakes can be found by Maya over at Maya Made.  This also happens to be a favorite blog of mine, and you’ll probably enjoy getting lost in the images of her gorgeous farmhouse and handmade loveliness.

We used a pack of precut tissue circles like these from Discount School Supply, but any tissue paper or other thin paper will work equally well.

snowflake activity for kids

Step 2: Lay them out over a sheet of card stock

4-year old N set hers out on top of two sheets of card stock that she taped together.

snowflake collage activity for kids

Step 3: Get your Mod Podge and Palette Knife ready

I spread a thin layer of Mod Podge onto the paper to which N deftly attached each snowflake. She was in charge of the layout, which included some beautiful layering of colors. After she placed the snowflake, I added a little more Mod Podge to seal it in place.

Watered down white glue will also work if you don’t have Mod Podge, but I’d encourage you to invest in some because it works so well for all sorts of collage activities.

gluing-snowflakes-down-e1353915804190

Step 4: Keep making snowflakes until you’re done

Snowflake collage activity for kids

Step 5: If your dad’s birthday is coming up, turn it into a gift 🙂

Or, proudly hang your masterpiece and welcome in the winter season.

It’s all about the process

Like all the projects on this site, I hope  you’ll take this inspiration and run with it in your own direction. Or better yet, your child will take it in his or her own direction. Happy exploring!

You might also enjoy

Rolled Paper Snowflakes

Hanging Holiday Stars

Last-minute DIY activities to make with the kids


Filed Under: Christmas, Collage, Elementary, Pre-School, Toddler, Winter Tagged With: christmas, collage, mod podge, snowflake, winter

Fall Craft Ideas: Paint Coffee Filter Suncatchers

By Rachelle

If you’re interested in ways to bring the Fall season to life, today I’m sharing fall craft idea that encourages children to be inventive and think independently.

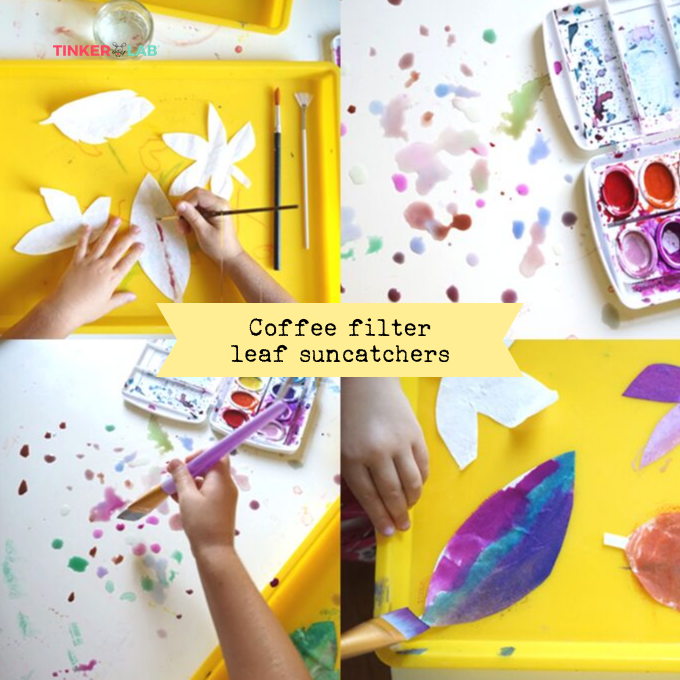
A Fall Art Invitation: Coffee Filter Leaf Sun Catchers

Present the Supplies as an Art Invitation

If you follow TinkerLab, you know that I appreciate projects that encourage children to think for themselves and come up with their own unique spin on the materials. Like so many of our projects, I present the supplies to my children as an art invitation. Once the supplies are in front of my kids, they are free to use the materials in any way the please.

So, what will we need?

The supplies for this project are so easy!

A Fall Art Invitation: Coffee Filter Leaf Sun Catchers

Here’s the set-up…

A Fall Art Invitation: Coffee Filter Leaf Sun Catchers

Pre-cut coffee filters into leaf shapes. As you can see in the first image in this post, there were a few requests for hearts too. Related to that, this is by no means an exclusive-to-Autumn activity. Cut out hearts, moons, trees, flowers, or even shamrocks. Have fun with this!

Place the cut-out shapes on a tray. We used an art tray, but a cookie sheet with a rim will work equally well. You’ll want the tray because this project can get drippy, and all that liquid will be nicely contained in this walled-off area. I found our art trays at Michaels and spotted something similar over on Amazon (affiliate link).

For two children, you can have them share a bowl of water as I did, or give them each their own water (they would appreciate that, I’m sure!).

A Fall Art Invitation: Coffee Filter Leaf Sun Catchers

At ages three and six, my kids had very different approaches to this task.

As you can see from the dot-covered table, my three-year old had a GREAT time exploring dot-making on the table. My older daughter experimented with drawing veins and rainbow effects, and her little sister soon got on board with similar tasks.

It’s always interesting to see how artists influence each other, and I’m 100% okay with copying as it’s a way of learning.

A Fall Art Invitation: Coffee Filter Leaf Sun Catchers

Kids also like to experiment with different paintbrushes (flat, round, fan, skinny, and fat) to achieve a variety of textures and lines. If you have a collection of paintbrushes, this is a great project to bring them out for.

Drying the Coffee Filters

If your child gets into this project, you will have A LOT of painted coffee filters to contend with. As such, you’ll need to set up a space to dry these gorgeous leaves.

Roll out a large sheet of paper or lay down newspaper, and then place the painted cut-outs on the paper until dry. Because the paper is so thin, they tend to dry incredibly fast!

A Fall Art Invitation: Coffee Filter Leaf Sun Catchers

Once dry, hang the shapes in a window with a bit of transparent tape. Admire the colors as the sun shines through them.

More Fall Craft Ideas

Make a shimmering Fall Lantern

This easy Sticky Autumn Collage is perfect for toddlers and preschoolers

Preserve your leaves in glycerin with Glycerin Leaves

This is our favorite play dough recipe, with a fall scent: DIY Pumpkin Pie Playdough

Make Leaf Sun Prints as a way to preserve leaf shapes on fabric.

And for a whole slew of Autumn ideas, check out the fun Fall Bucket List

Is this your first time here?

Join the Tinkerlab network and be the first to know about simple art + science projects for kids, creativity tips, and simple ideas that will make your life more creative. Sign up for our newsletter.

TinkerLab Newsletter

In case you blinked and missed it, TinkerLab rounds up all the great stuff on the internets on keeping you and your critters creative and wraps it up for you in a tidy newsletter! (And throws in some secret giveaways for good measure!)  – Yuliya P., San Francisco, CA

Join our community and you’ll learn:

  • How to simplify your life and make more room for creativity
  • How to make hands-on making a part of your everyday life
  • Easy, actionable ways to raise creative kids

Filed Under: Art Activities, Elementary, Fall, Pre-School Tagged With: autumn, fall

DIY Pumpkin Pie Playdough

By Rachelle

Have you ever made your own play dough? While I’m a fan of store bought dough (it’s so easy!), making your own is a money saver and we can make TONS of it in minutes. And with the simple addition of a little pumpkin pie spice, our dough smells heavenly…just like pumpkin pie!

Also, this is first on our big Family Fall List of 50 things to do this autumn, so check!

Inspired by The Artful Parent’s Autumn Arts and Crafts book, The Artful Year: Autumn, we made this seasonal scent that’s perfect for autumn: Pumpkin Pie!

Pumpkin Pie Playdough Recipe…

Playdough is a wonderful material for building fine motor skills, developing imaginations through exploratory play, and supporting early engineering and building skills. This recipe rivals anything store-bought.

I used our favorite play dough recipe, which also happens to be the favorite of my daughter’s awesome preschool class (and the BEST play dough recipe, hands-down), so I’m not going to get experimental with the dough itself, but we did experiment with the spice combination. 

The dough itself takes about 20 minutes to prepare, it cooks on the stove-top, and the key ingredient is cream of tartar. If you can’t find it locally, cream of tartar is on Amazon, of course (affiliate).

Yes, you can find 2-minute dough recipes like this no-cook dough, and I’d encourage you to use them if you’re short on time, but the benefit of this recipe is that it will last for ages. Ages. I kid you not.

Click here to download the free printable pumpkin pie playdough recipe card (PDF)

Ingredients

  • 5 cups water
  • 2 1/2 cups salt
  • 3 tbsp. cream of tartar
  • 10 tbsp. vegetable oil
  • 5 cups flour
  • Food coloring or liquid watercolors
  • Pumpkin Pie Spice, or a blend of cinnamon, nutmeg, ginger, and cardamom

Steps

  1. Mix everything but the food coloring together in a large pot until somewhat smooth. It will be lumpy. Not to worry, the dough will get smoother as it cooks.
  2. Cook the dough over a low heat. Mix frequently. The water will slowly cook out of the mixture and you’ll notice it starts to take on a sticky dough appearance.
  3. Keep mixing until the edges of the dough along the side and bottom of the pan appear dry. Pinch a piece of dough. If it’s not gooey, the dough is ready.
  4. Place the dough on a counter top or large cutting board or cooking tray that can withstand a little food coloring.
  5. Knead the warm dough until it’s smooth and then divide it into the number of colors that you’d like to make. We divided our in half: one orange and the other white.
  6. Flatten the ball, add a little bit of food coloring, and knead it in. Add more food coloring to get the desired shade.
  7. Store the dough in a large Ziplock bag or sealed container. Unused, it’ll keep for months.
"Smells Amazing" Pumpkin Pie Play Dough | TinkerLab.com

After we made the dough, I placed it on the counter to cool. Meanwhile, my 2-year old worked away at pinching out a real pie crust.

"Smells Amazing" Pumpkin Pie Play Dough | TinkerLab.com

When the dough was cool to touch, we squeezed orange liquid watercolors on half of it and then kneaded it in. For this step, be sure to mix on a surface that won’t absorb the watercolors. My 4-year old wanted to make half the dough orange and half of it white.

"Smells Amazing" Pumpkin Pie Play Dough | TinkerLab.com

Although we had planned to use a jar of pumpkin pie spice in the dough, my 4-year old was curious about using whole spices that we just bought, so we pulled out the coffee grinder and gave it a very loud whirl. Fun! I don’t have a proper nutmeg grinder, but this seemed to do the trick. And the smell of cardamom — I absolutely love it.

We experimented with the spice blend by adding the different spices, first quite cautiously and then rather liberally, and in different combinations. I learned that my 4-year old isn’t too crazy about the smell of cardamom, but loves cinnamon.

"Smells Amazing" Pumpkin Pie PlayDough | TinkerLab.com

My 2-year old was very happy, however, to shake-shake-shake the pie spices all over her gigantic mound of dough. Can you imagine how yummy our kitchen smelled?

After all this cooking, it was time to bake! At this point, our orange and white/tan doughs marbled into something lovely, and we got busy making small cakes and setting them out to eat on a 3-tier plate server.

But, don’t just take it from me that this play dough is awesome. Kelly from Wonder & Create Art Studio tested the playdough with her kids and says, “To get a fall fever fix in without donning a sweater or firing up the oven, make the @tinkerlab Pumpkin Pie Playdough recipe! It smells, feels and looks divine! Thanks, Rachelle, for this recipe and the wonderful emails you send!”

And then she kindly shared photos from their creative play session. So inspiring! Take a look…

The cotton ball whipped cream is genius, don’t you think?

Make mini pumpkins with fork tines and pipe cleaners. Awww.

More Fall Activities

The Great Big Family Fall List (print this for the fridge!)

More Playdough Recipes

Rainbow Play Dough, Tinkerlab

Cloud Dough, TinkerLab

Gluten-free Cloud Dough, TinkerLab

No-cook Cinnamon Playdough, The Imagination Tree

Glowing Play Dough, TinkerLab

Masa (Corn Flour) Play Dough

Downloadable (Free) Playdough Recipe Book, Nurture Store

Candy Cane Play Dough, Artful Parent

Filed Under: Art Activities, DIY, Dough, Fall, Imagination, Kitchen, Pre-School, Sensory, Toddler Tagged With: autumn, dough, fall, playdough

Creative Ways to Spend a Sick Day

By Rachelle

tea for two

How do you get through sick days?

With Spring just around the corner, I thought that maybe maybe maybe we would be the lucky ones who made it through winter without getting sick. Wishful thinking! My oldest came down with a fever the other day and we’ve been holed up at home, gathering our energy and drinking lots of fluids.

reading peg leg peke

I have an arsenal of indoor activity ideas, but to be stuck inside all day long…that’s another story. Lots of tea, patience, and cuddles are in top order.

There was a break in the day when we felt a little better. So we threw on our rainboots for some puddle stomping. Fresh air always helps, doesn’t it?

Bring Books to Life

The other day I fell in love with this article on Little Stories called How to Pretend.The idea that really stuck with me was about acting out books to bring them to life.

To pull this off, I found a big box of stuffed animals in our closet — little friends that we haven’t seen in ages. That alone was thrilling to my kids. And then we picked out a few favorite books with animal characters that we could bring to life with our toys and puppets.

I envisioned that I would lead a puppet show of sorts while reading the books, sort of like a librarian or preschool teacher telling a story through a felt board. But my 3 year old wanted to enact the roles while I read. I live for these moments that surprise.

reading with props stuffed animals

Brown Bear, Brown Bear, What Do You See? (affiliate) was especially good for putting all of our toys to work. We don’t have a cat stuffed animal, but my kids were happy to substitute bunny. They really loved this and I’m sure we’ll do it again on our healthy days too.

It looks like we’re home for one more day, just to be safe.

I have a fun Saint Paddy’s Day photo booth invitation set up, but not too many more ideas.

What do you like to do with your kids on sick days? How do you keep them happily engaged indoors all day long?

More Sick Day Ideas

I was interviewed in this article, Screen-free Alternatives for Sick Days, at The Washington Post, where I share simple and engaging ideas (that don’t take tons of energy) such as playing with play dough, creating with stickers, making tape roads, and playing with a sensory bin. Click over for more ideas.

Filed Under: Elementary, Imagination, Indoor Activities, Pre-School, Toddler Tagged With: activities, children, projects, sick

Next Page »

Copyright © 2021 - TinkerLab ® - All Rights Reserved - Privacy Policy