TinkerLab

  • HOME
  • ACTIVITIES
    • ART
    • SCIENCE PROJECTS
    • SENSORY
    • BABIES
    • TODDLERS
    • PRESCHOOL
    • ELEMENTARY
    • MONTHLY ART CHALLENGE
  • BOOKS
  • ABOUT
    • START HERE
    • ABOUT RACHELLE
    • FAQ
    • PRIVACY POLICY
    • IN THE MEDIA
    • SUBSCRIBE
    • LOCAL NEWSLETTER
    • CONTACT
  • CLASSES
  • SHOP
  • BLOG
You are here: Home / Archives for art recipe

Paint Recipe for Kids |Homemade Finger Paint

By Rachelle 3 Comments

homemade finger paint recipe

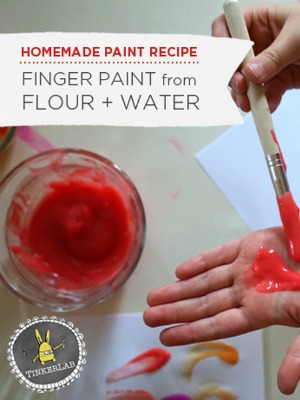
Today I’ll share how to make the easiest homemade finger paint from basic, edible ingredients: flour, water, and food coloring.

Easy homemade finger paint | Tinkerlab.com

Do you ever worry about the ingredients that come in store-bought paint?

This is less of a concern now that my children no longer put everything they find in their mouths, but I thought about things like this when my kids were toddlers. Seeing the “non-toxic” label certainly helped, but it’s another thing to know that the ingredients in my art supplies are entirely edible. 

Easy homemade finger paint | Tinkerlab.com

Supplies for Homemade Finger Paint

The basic ratio is 1 flour: 2 water, so scale up or down according to how much paint you’d like to make. We used washable, non-toxic liquid watercolors to add color to the paint, but you could also use food coloring for a similar effect.

  • 1/2 cup flour
  • 1 cup water
  • pinch of salt (optional)
  • extra water
  • Food coloring or liquid watercolors (these link to two of our favorite supplies)

Directions

  1. Pour flour and water into a pot.
  2. Stir the ingredients over medium heat until it comes together like smooth, thick paste. The mixture will be lumpy along the way, but it all comes together.
  3. When it starts to pull away from the pot, remove from the heat.
  4. Add a pinch of salt. This helps keep the paint from spoiling if you don’t use it right away.
  5. To reach the desired consistency, slowly add cold water to the mixture. I added about 1/4 cup water to our paint. 
  6. Divide the paint into bowls.
  7. Squeeze food coloring or liquid watercolors into the flour mixture until you reach the desired color.
  8. Store in a covered container in the fridge if you’re not planning to use this right away. It will keep indefinitely.

mixing flour water 1

mixing flour water

Easy homemade finger paint | Tinkerlab.com

Liquid watercolors for easy homemade finger paint | Tinkerlab.com

These liquid watercolor paints are washable and non-toxic, and my absolute favorite.  The pack of eight colors (8 oz. each) is about $30, which makes each bottle just under $4. When you consider how much food coloring you get in a tiny bottle, these liquid watercolors are totally worth it, in my opinion. If the value-pack is out of stock or you’re not interested in committing to eight colors, you could also order these paint bottles individually.

Easy homemade finger paint | Tinkerlab.com

Now the paint is ready to experiment with.

The texture is like pudding and feels nice on the hands. My kids enjoyed painting it on their hands to make hand prints, and they also used brushes to paint in a more traditional way.

Easy homemade finger paint | Tinkerlab.com

The pigment of the paint won’t stick to the paper like poster paint will, so if your child wants brilliant colors to pop out, he or she will need to put the paint on extra thick. Like this…

Easy homemade finger paint | Tinkerlab.com

My 5-year old made this painting, and the thickness of the paint meant that it took a solid 24-hours to dry. The thinner the paint is applied, the quicker it will dry.

The Pros and Cons of Homemade Finger Paint

One final word on the quality of this paint. The benefits of this homemade finger paint are plentiful. It’s:

  • Made from familiar ingredients
  • Non-toxic
  • Economical
  • Safe to eat

The cons are less troublesome, but worth mentioning nonetheless:

  • The paint is perfect for finger painting, but less than ideal for using a paintbrush. My kids didn’t seem to mind, but it’s something to consider if you’re looking for a traditional paint recipe.

Easy homemade finger paint | Tinkerlab.com

The texture and quality of the paint make it ideal for finger painting, but my kids still loved it. Keep in mind that generally speaking, children are more interested in the process of making something than in the final outcome. I asked my children (ages 3 and 5) numerous times about the paint, and they agreed that this recipe is a keeper.

Other Art Activities and Recipes with Liquid Watercolors:

The BEST play dough recipe, seriously. It’s an amazing recipe that will keep for ages.

Marbleized Paper, this stuff is GORGEOUS!

Watercolor Painting — make these adorable watercolor bunnies.

Straw-blown watercolor painting — this is such a fun, all-in activity. W giggle every time we do it.

Filed Under: Organization Tagged With: art recipe, painting, preschool, toddler

Glowing Playdough Recipe

By Rachelle 19 Comments


Today I’m joined by Tinkerlab reader Natasha Levochkina McCain, who’s sharing her glowing playdough recipe with us today. This is one of the coolest ways to update play dough, and I think you’ll get a kick out of it. We sure did.

Enjoy!

Glowing playdough recipe | Tinkerlab.com

This play dough inspired my whole family.

Not just my two sons (three and five years old), but even a very busy and sometimes moderately grumpy Dad and our 15 year old.

Not only was it exciting for the kids to stay up after dark to play with the dough, but they also created space landscapes, alien creatures and even an alien alphabet. While it was not an entirely accidental invention, it was not too far from it.  

glow playdough with handprints | tinkerlab.com
The intension was to make some fun looking play dough for a 6 year old boy as an impromptu present. His sister was going to receive some flower scented dough and I could think of nothing better than this for a boy. 

I started mixing the ingredients before I realized that I only had unbleached whole wheat flour left.

Disaster? Not at all!

I decided to go ahead and to make the dough anyway. I used my favorite Tinkerlab play dough recipe (with exception to the whole wheat flour) for the playdough itself:

Print
Glowing Play Dough Recipe

Rating  5.0 from 2 reviews

Prep time:  20 mins

Making time:  5 mins

Total time:  25 mins

: 10

: 0

: 0

Make traditional play dough...that also happens to glow!
Supplies
  • 5 cups water
  • 2½ cups salt
  • 3 tbsp. cream of tartar
  • 10 tbsp. vegetable oil
  • 5 cups flour
  • Food coloring or liquid watercolors (optional)
  • Glo Away by Plaid (glow in the dark paint via Amazon)
  • Black Light
Steps
  1. Mix everything but the food coloring and the glo-away together in a large pot until somewhat smooth. It will be lumpy. Not to worry, the dough will get smoother as it cooks.
  2. Cook the dough over a low heat. Mix frequently. The water will slowly cook out of the mixture and you’ll notice it starts to take on a sticky dough appearance.
  3. Before it gets too sticky add a few tablespoons of Glo Away
  4. Keep mixing until the edges of the dough along the side and bottom of the pan appear dry. Pinch a piece of dough. If it’s not gooey, the dough is ready.
  5. Place the dough on a counter top or large cutting board or cooking tray that can withstand a little food coloring.
  6. Knead the warm dough until it’s smooth
  7. Store the dough in a large Ziplock bag or sealed container. Unused, it should keep for months.
  8. Turn the lights down low and illuminate the play dough with a black light.
3.3.3077

 
While cooking it and while the dough was still not solidified I added about 4 oz (1 small bottle) of Glo-Away glow in the dark gel by Plaid and continued mixing. The texture is rather coarse because of the type of flour but it provides a unique benefit in the end result.

The glowing particles distribute themselves differently because of the larger grain fragments. While kneading the dough on a plastic cutting board (to avoid stains) I added some green food coloring to it.

And of course, you’ll need a black light to illuminate the glowing dough.

Here’s what it looks like in the dark:

glow playdough in the dark

The next day I also made “regular” play dough with regular “white fluffy” flour. I added no color to it, just the Glo Away. 

glow playdough with white dough

The glow pigment looks different in this one and it is fun to use them both for creating amazingly fun extraterrestrial creatures and landscapes.

glow playdough character

About Glo Away:  The manufacturer says that it’s “Safe to use on fabric, wood, glass, plastic and ceramics. Non permanent washes away with soap and water. Certified AP non-toxic. Great for decorating kids rooms and ceilings.”

Thanks for joining us today, Natasha! If you have a favorite art recipe to share, email us at rachelle at Tinkerlab.com.

Note: This post contains affiliate links, but we only share links to products that we adore or that we think you’ll find useful.

Natasha Mc Cain About Natasha Levochkina McCain.
I am a teacher and I love children, animals and living. My husband says I am strong and I think I am feminine. So, here I am.


Is this your first time here? Join the Tinkerlab network and be the first to know about simple art + science projects for kids, creativity tips, and simple ideas that will make your life more creative.


Filed Under: Organization Tagged With: art recipe, playdough, preschool, toddler

Copyright © 2019 - TinkerLab ® - All Rights Reserved