Today I’ll share how to make the easiest homemade finger paint from basic, edible ingredients: flour, water, and food coloring.

Do you ever worry about the ingredients that come in store-bought paint?
This is less of a concern now that my children no longer put everything they find in their mouths, but I thought about things like this when my kids were toddlers. Seeing the “non-toxic” label certainly helped, but it’s another thing to know that the ingredients in my art supplies are entirely edible.

Supplies for Homemade Finger Paint
The basic ratio is 1 flour: 2 water, so scale up or down according to how much paint you’d like to make. We used washable, non-toxic liquid watercolors to add color to the paint, but you could also use food coloring for a similar effect.
- 1/2 cup flour
- 1 cup water
- pinch of salt (optional)
- extra water
- Food coloring or liquid watercolors (these link to two of our favorite supplies)
Directions
- Pour flour and water into a pot.
- Stir the ingredients over medium heat until it comes together like smooth, thick paste. The mixture will be lumpy along the way, but it all comes together.
- When it starts to pull away from the pot, remove from the heat.
- Add a pinch of salt. This helps keep the paint from spoiling if you don’t use it right away.
- To reach the desired consistency, slowly add cold water to the mixture. I added about 1/4 cup water to our paint.
- Divide the paint into bowls.
- Squeeze food coloring or liquid watercolors into the flour mixture until you reach the desired color.
- Store in a covered container in the fridge if you’re not planning to use this right away. It will keep indefinitely.


These liquid watercolor paints are washable and non-toxic, and my absolute favorite. The pack of eight colors (8 oz. each) is about $30, which makes each bottle just under $4. When you consider how much food coloring you get in a tiny bottle, these liquid watercolors are totally worth it, in my opinion. If the value-pack is out of stock or you’re not interested in committing to eight colors, you could also order these paint bottles individually.

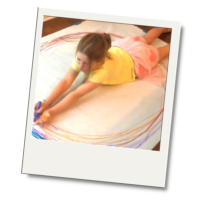
Now the paint is ready to experiment with.
The texture is like pudding and feels nice on the hands. My kids enjoyed painting it on their hands to make hand prints, and they also used brushes to paint in a more traditional way.

The pigment of the paint won’t stick to the paper like poster paint will, so if your child wants brilliant colors to pop out, he or she will need to put the paint on extra thick. Like this…

My 5-year old made this painting, and the thickness of the paint meant that it took a solid 24-hours to dry. The thinner the paint is applied, the quicker it will dry.
The Pros and Cons of Homemade Finger Paint
One final word on the quality of this paint. The benefits of this homemade finger paint are plentiful. It’s:
- Made from familiar ingredients
- Non-toxic
- Economical
- Safe to eat
The cons are less troublesome, but worth mentioning nonetheless:
- The paint is perfect for finger painting, but less than ideal for using a paintbrush. My kids didn’t seem to mind, but it’s something to consider if you’re looking for a traditional paint recipe.

The texture and quality of the paint make it ideal for finger painting, but my kids still loved it. Keep in mind that generally speaking, children are more interested in the process of making something than in the final outcome. I asked my children (ages 3 and 5) numerous times about the paint, and they agreed that this recipe is a keeper.
Other Art Activities and Recipes with Liquid Watercolors:
The BEST play dough recipe, seriously. It’s an amazing recipe that will keep for ages.
Marbleized Paper, this stuff is GORGEOUS!
Watercolor Painting — make these adorable watercolor bunnies.
Straw-blown watercolor painting — this is such a fun, all-in activity. W giggle every time we do it.

Having read this I thought it was very informative. I appreciate you
spending some time and effort to put this short article together.
I once again find myself personally spending way too much time both reading and posting comments.
But so what, it was still worth it!
[…] Arts and crafts can get a bit messy, so be sure to dress the little ones in some clothes you don’t mind getting dirty. And to help minimize your worry over accidents and spills, put a layer of plastic over the floor (a garbage bag will do just fine). Now that setup is complete, unleash the glitter and paint for some fun arts and crafts. You can even let the kids help make some homemade finger paint. […]
Thanks so much! My 9 month old loved this! I covered her in aquaphor to avoid stains on her skin, which worked perfect. If you use a lot of food coloring you can achieve vibrant colors.
[…] are plenty of safe finger paints to buy off the shelf but also try mud and these amazing homemade fingerprinting recipes from Tinkerlab. Learn Play Imagine has a great round up of all sorts of painting fun for infants […]
[…] activity provides a sensory experience as well as an opportunity to build eye-hand coordination. Make your own finger paint at home or buy ready-made paint. Your children will love learning while getting their hands in the […]
[…] I found a recipe at Tinker Lab. […]
[…] Finger paint […]
[…] paint can be bought or made at home with simple ingredients. Here is a recipe using flour, water and food […]
Could I use old markers for the color effect for the paint. My kids have several washable markers that they lost lids to that I still held on to thinking I could use them for something else. Do u think it would work?
Hi Kama, we haven’t done this, but you could definitely try this. My guess is the color will not be as vibrant. Pull the marker sponges from the tubes and soak them in alcohol to remove the color, and then add to the recipe.
How would you store extra paint and how long have you found them to last?
Put it in a ziplock bag i guess?
Thank you for sharing your recipes and activities with your kids. This is a great and informative source for new moms like me.
My name is Jaylen Cooper, I am a senior student at Sato Academy of Mathematics and Science in Long Beach and I am working on a project for my capstone engineering class. I want to make my project related to creating of oil paints and how I could develop something to make the process more time and cost effective, but first I need to make sure that this is a project worth looking into. So I have contacted you in hope to get information on the process of making oil paints and any difficulties that come with it. If you can reply with any information on this topic it would be greatly appreciated by my team and I.
[…] are numerous recipes out there, but I used this one from Tinker Lab. I’m glad I did, because my curious toddler did indeed taste the paint several […]
but I just discovered an open bag of white chocolate chips in the cupboard. Maybe I could throw those in with a few mints or candy canes to get the same effect?For mor visitmold removal toronto
[…] Like Picasso -Finger paint. Use this recipe to make your own. – Paint with marbles – Paint an old t-shirt – Paint a […]
[…] while I finish up supper. I give her a piece of paper or a paper plate, her nature treasures and this homemade non-toxic paint to use […]
That’s why I’m currently looking for an interior painting contractor that will be able to do this job successfully. Before considering him for the job, I’ll make sure to check if he has good quality paint because as you’ve mentioned, expensive paint can help me reduce costs in the long run.
[…] https://tinkerlab.com/paint-recipe-kids-homemade-finger-paint/ […]
[…] Homemade finger paint using flour and water (on Tinkerlab) […]
[…] finger paint? There’s no need to worry about toxins thanks to this homemade paint recipe from Tinkerlab. Kids will learn about color mixing and they’ll have a blast getting messy and making art. Add […]
[…] Finger paints – using flour and […]
[…] and much more. Many prefer acrylic paints for this purpose, however, while you may even choose to make them at home if you decide to involve the little ones in this work of […]
Thanks for sharing another wonderful recipe. I like garlic flavor in some recipe making and that’s the reason I will learn this whole procedure. It seems to prepare easily at home.rluy
Made this tonight with butternut squash but didn’t have feta or the herbs for the dressing. Still, was a nice combination of flavors. I added shitake mushrooms with the kale.rluy
That’s quite an interesting finger paint, Lisa!
Hi, Loved your recipe. you have made it very simple for even a beginner like me. thanks for sharing.juice
[…] Finger painting – you can buy that or make your own paint using this recipe. […]
Hi, I know this recipe was posted years ago, but I just wanted thank you for this is easy and delicious meal. food Mixer
Tania, one square of chocolate is equal to one ounce (so you need two ounces for this recipe) and a stick of butter is roughly 4 oz (1/4 pound). I’m making this tonight, looks good.organic food
[…] created taste safe paint by mixing flour, water and food colouring together. I then added in jumbo paintbrushes as these are […]
Finding professionals is easy with Organic products Providers. Search our website to instantly connect with business and professionals. For professionals, our website works as a powerful tool for attracting more clients.
[…] Finger painting – you can buy that or make your own paint using this recipe. […]
hi!
Have you tried using natural food colouring on this recipe? As in Beet Powder, Turmeric etc?
Thanks
This really looks tasty and this is one of the reasons why this is in demand in diners and even in catering Fort Lauderdale. I hope that my folks will enjoy this as much as you do. Thank you again. Keep posting such great recipes.Vodka
Amazing!!! Thanks for sharing such a kind of healthy recipes. It’s very tasty & easy recipes.Healthy Food Killeen
Yeah friends, it was really delicious & healthy! Addition of tofu gives it a different flavour. Do try it out & lemme know 🙂 So happy that you all loved this healthy pasta!Lazy keto meal