TinkerLab

join button

join button
  • HOME
  • ABOUT
    • ABOUT
    • FAQ
    • CONTACT
    • PRIVACY POLICY
  • ACTIVITIES
    • ART
    • SCIENCE
    • SENSORY
    • BABIES
    • TODDLERS
    • PRESCHOOL
    • ELEMENTARY
    • MONTHLY ART CHALLENGE
  • SCHOOLHOUSE
    • LEARN MORE
    • MEMBERS LOGIN
  • BOOKS
    • TINKERLAB: A HAND-ON GUIDE FOR LITTLE INVENTORS
    • TINKERLAB ART STARTS
    • CREATIVE ADVENTURES IN CURSIVE
  • BLOG
  • NEWSLETTER
You are here: Home / Archives for Art Activities / Sculpture

STEAM Project: Design Challenge with Sticks, Clay, and a Mandarin

By Rachelle

steam activity challenge support mandarin

STEAM activity challenge for kids: engineering challenge to support a mandarin

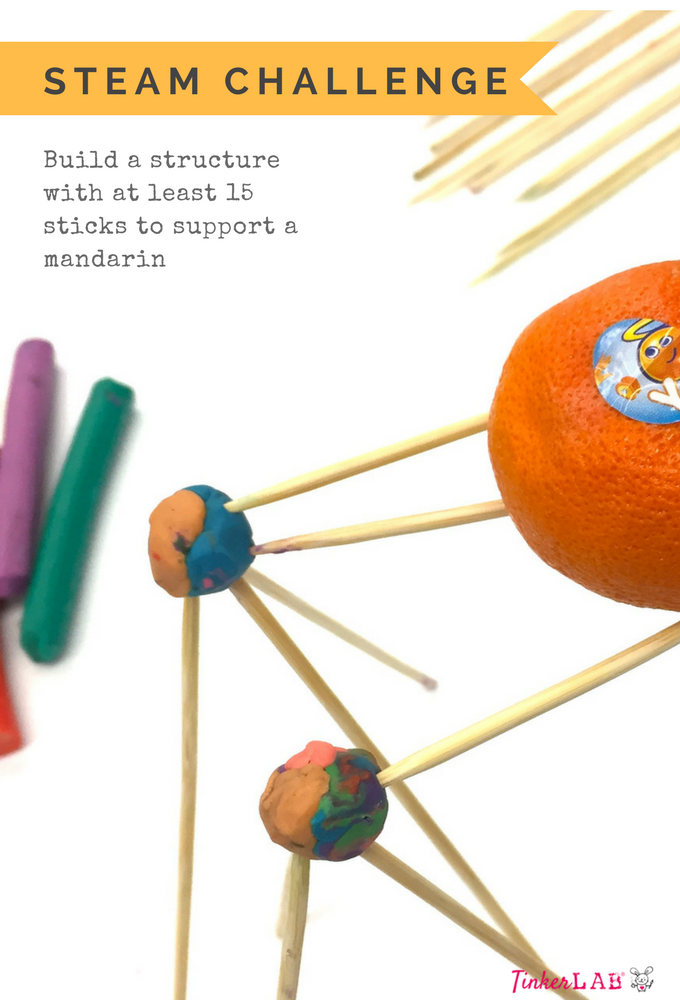
This open-ended STEAM project encourages children to use creative and critical thinking skills to build a structure, with limited supplies, to support a mandarin. Once you set up the building invitation, stand back (or build side-by-side) and watch imaginations unfold. Sky is the limit, creativity is encouraged, and all solutions are welcome!

New to STEAM? STEAM stands for Science, Technology, Engineering, Art, and Math. A STEAM project incorporates at least two of these disciplines in one project. In this challenge, we will work with engineering and art. 

supplies design challenge

This article may contain affiliate links

The Challenge

Build a structure, using at least 15 skewers, to support a mandarin.

Supplies

  • Wonderful Halos
  • 6″ Bamboo Skewers *
  • Modeling Clay – we love this brand

* Note: If you have a different size skewer, that’s fine, too!

The Set Up

The set up is simple. Clear the table and set up the supplies, including a small collection of  Wonderful Halos mandarins. They are a great snack time treat, and can be included in creative engineering projects to teach kids that healthy snacking is fun. They’re in season from November to May, and I can’t forget to mention that Wonderful Halos are sweet, seedless and easy to peel, perfect for kids and adults!

  1. Fill a cup with skewers.
  2. Open box of modeling clay.
  3. Gather Wonderful Halos mandarins
  4. Print out a challenge table card (optional – see below for link to PDF)
  5. Place all the supplies on the table and invite your child to build a structure, using at least 15 sticks, to support a mandarin.

steam activity challenge support mandarin

The solutions we saw were wildly different.

The LOW structure

This totally stable structure was able to support multiple mandarins. Scroll down to see the results. None of the mandarins touched the table! This solution actually prompted a new challenge to build a structure that can support more than one mandarin.

low structure stem challenge

The Speared Structure

This one gets points for ingenuity. Nothing in the challenge says that the mandarin has to balance on the sticks. Totally cracked me up. Genius!

multiple solutions stem challenges

The Tripod Solution (above)

The above structure was built with 4 tripods and exactly 15 sticks. Works like a charm!

All of these solutions prompted more challenge ideas!

We tested this with a group of Stanford students (so fun – they’re such a brilliant group!) who came up with more novel solutions.

steam challenge stanford

more stem challenges

Make the Tallest Free-standing Structure

Make the Tallest Free-standing Structure you can, using just 20 sticks. My 7-year old loved this one, especially with Wonderful Halos by her side. Just look at her face to see how proud she is to accomplish the task!

STEM activity how tall can you build a free standing structure_

Build a Structure that can Support More than one Mandarin

This one was mentioned earlier. My 9-year old loved got wrapped up in aesthetics during the assembly process.

stem activity support multiple mandarins

Build a Vehicle using sticks, clay, and mandarins

Two of the aforementioned Stanford students built this truck, inspired by the Stanford d.School Truck, an old fashioned truck, parked right inside the Hasso Platner Institute of Design.

Download the STEAM Mandarin Design Challenge Cards

Click the image below or click this link to download your FREE Design Challenge cards.

Thank you Wonderful Halos for sponsoring this post. All opinions are my own.

More Projects like this one

Spaghetti Tower Marshmallow Challenge

DIY Paper Tube Marble Run

Fort Building Kit

DIY Water Wall, it’s like a marble run, but with water!

Build an easy light table

Make Gumdrop Sculptures


Filed Under: Art Activities, Engineering, Sculpture, STEAM

The Best Homemade Playdough Recipe (super soft, lasts for months)

By Rachelle

homemade playdough recipe

At TinkerLab, we love making playdough, and today we’re sharing what is easily the BEST playdough recipe ever. I’ve been making this recipe for over seven years, and haven’t looked back since. The recipe was handed down to me by a preschool teacher, and it can’t be beat. I’m so confident about this recipe, in fact, that there’s a copy of it in my best-selling book, Tinkerlab: A Hands-on Guide for Little Inventors.

The best playdough recipe | How to Make play dough | Tinkerlab.com

Why this is the best playdough recipe

  • It’s easy to make (see our no-cook version of the recipe below)
  • It will last for months if stored in a sealed container or bag
  • It’s inexpensive. Compare it to store bought dough and you are saving loads of cash.
  • The texture is divine. It’s soft, pliable, and fun to work with.

Our Plan

My plan was to make a simple batch of play dough to replace the sparkly dried out purple stuff that happily met our cookie-making, glitter infusing, practice cutting, snowman-making needs over the past two months. I asked my daughter what color she would like this time around, and she answered with…

ALL of them.

The best playdough recipe | How to Make play dough | Tinkerlab.com

Ahem. Right.

The way I have always made playdough requires that I add the color to the whole batch while it’s cooking, making it difficult to make multiple colors. But by some lucky, happy accident we managed to add the ingredients in the wrong order, which is no doubt the result of making dough with a two year old while chatting with my mother-in-law and goo-gooing at my baby! But, as that same luck would have it, I think we landed on the best playdough recipe yet. The texture is buttery and I was able to deliver on the multiple colors request.

And this ingredient, my friends, is the secret to having strong, smooth playdough that won’t crumble.

So, without further ado…The Best Playdough Recipe

The best playdough recipe | How to Make play dough | Tinkerlab.com

Ingredients

This post contains affiliate links

    • 2.5 cups water
    • 1 1/4 c. salt
    • 1 1/2 tbsp. cream of tartar 
    • 5 tbsp. vegetable oil
    • 2.5 cups flour
  • Food coloring or liquid watercolors. I’m a fan Sax Concentrated Liquid Watercolors and Wilton Icing Colors, which make gorgeous shades of play dough to match any occasion, mood, or toddler request.

Steps

  1. Mix everything but the food coloring together in a large pot until somewhat smooth. It will be lumpy. Not to worry, the dough will get smoother as it cooks.
  2. Cook the dough over a low heat. Mix frequently. The water will slowly cook out of the mixture and you’ll notice it starts to take on a sticky dough appearance. Keep mixing until the edges of the dough along the side and bottom of the pan appear dry. Pinch a piece of dough. If it’s not gooey, the dough is ready.
  3. Place the dough on a counter top or large cutting board that can withstand a little food coloring.
  4. Knead the warm dough until it’s smooth and then divide it into the number of colors that you’d like to make. I divided mine into four balls, flattened each of them, added a little bit of food coloring or liquid watercolors, and then kneaded it in. I added more food coloring to get the desired shades of yellow, pink, teal, and lavender.
  5. Play with the dough right away or store it in a large Ziplock bag or sealed container. Unused, it’ll keep for months. For play dough tool ideas, you can read this post.

The best playdough recipe | How to Make play dough | Tinkerlab.com

There you have it, rainbow play dough (aka the best playdough recipe ever).

No-cook Best Playdough Recipe:

the best no cook playdoughI’ve been making this dough for a few years now without too many changes. After investing in this amazing BPA-free electric kettle, I was wondering if I could make this playdough off the stove top. So I did some experimenting, and low and behold — this recipe can be even easier and still the amazing dough that we all love. Here you go: No-Cook Playdough recipe.

homemade playdough recipe

More Playdough Recipes

How to Make Cloud Dough, the easiest dough recipe that calls for oil and flour.

How to Make Goop with just cornstarch and water.

Make amazing scented pumpkin spice playdough.

How to make Gluten-free Cloud Dough

Glowing Playdough

DIY Masa Playdough, made with masa harina

How to make Salt Dough with just salt, flour, and water.

What Else Can you do with Liquid Watercolors?

Liquid watercolors can be used for so many other recipes and projects such as:

  • Painting with Straws
  • Doily and Watercolor paintings
  • Marbleized Paper
  • Colorful Goop, a seriously amazing sensory experience

the best homemade play doh recipe

Filed Under: Dough, Pre-School, Recipe, Sculpture, Toddler Tagged With: play dough, rainbow, recipe

No Cook Playdough

By Rachelle

no cook playdough recipe

Would you like to make the best no cook playdough? One that will last for months and doesn’t require stovetop preparation?

the best no cook playdough

After making what I consider the best play dough recipe for a few years now without too many changes, I wanted to see if we could get the same results without using the stove.

I love drinking tea, and invested in an amazing BPA-free electric kettle, which seemed to be just the tool to take this play dough recipe off the stove top.

no cook playdough tea kettle

So I did some experimenting, and low and behold — if you want to go rogue, the original recipe can be even easier and still deliver the amazing dough that we all love. Here you go…

Supplies

  • 1 1/4 c. salt
  • 1 1/2 tbsp. cream of tartar 
  • 2.5 cups flour
  • 5 tbsp. vegetable oil
  • 2.5 cups water
  • Food coloring or liquid watercolors. I’m a fan Sax Concentrated Liquid Watercolors and Wilton Icing Colors, which make gorgeous shades of play dough to match any occasion, mood, or toddler request.

Directions

  1. Mix the first three ingredients together
  2. Boil water
  3. Mix the water and oil together in a small bowl
  4. Add the wet ingredients to the dry ingredients and mix until the dough comes together.

Filed Under: Art Activities, Clay, Dough, Elementary - 1, Pre-School, Recipe, Sculpture, Sensory, Sensory, Toddler

Recycled Art Sculpture | Mystery Box Challenge

By Rachelle

Recycled Art Sculpture | Tinkerlab.com

Do you have a box of recyclables with a plan to turn them into art or something amazing? Today we’re sharing one of our favorite recycled art projects using found objects, inspired by this project at the Boston Children’s Museum. and the Random Challenge Boxes from Matt Jervis at Make it Creativity.

Recycled Art with Upcycled Materials

Recycled Art Sculpture | Tinkerlab.com

I recently led a fun maker station for the California Museum Association’s (CAM) annual conference that we called the Mystery Box Challenge. While we often share child-led projects here on TinkerLab, the participants in this challenge were all all museum professionals. To see how my children interpreted the same prompt, click here. This project was inspired by the Art Studio at the Boston Children’s Museum.

Mystery Box Challenge

For the Mystery Box Challenge, I prepared a bunch of boxes by filling them with all sorts of interesting found objects and trinkets: pieces of wood, surplus plastic, cupcake holders, pipe cleaners, pom-poms, etc. Each participant received their own box with a prompt to make a critter from any or all of the supplies in the box.

I found the boxes at the craft store, some of the supplies came from RAFT (Resource Area for Teaching, a non-profit that sells low cost surplus materials for education), and others were found at the craft store and a local party store. We were also lucky to receive a generous donation of low heat glue guns and glue sticks from Blick Art Materials.  Thanks Blick!!

My colleague and art buddy Danielle and I set everything up, and then we waited for people to show up.

TinkerLab Mystery Box Challenge | TinkerLab.com

The table got busy and it was amazing to see the high level of focus from our incredible makers as they cut, glued, assembled, and invented their characters.

TinkerLab Mystery Box Challenge | TinkerLab.com

TinkerLab Mystery Box Challenge | TinkerLab.com

Once their critters were done, we invited everyone to have us take a photo of their inventive designs. Those who were on Instagram tagged their images with #tinkercritter. One of the best things about an open-ended prompt like this is to see how differently each person interprets the invitation and materials.

We were blown away by the creativity and ingenuity in the room!

Recycled Art Sculptures with Found Objects | Mystery Box Challenge | TinkerLab.com

Recycled Art Sculpture | Tinkerlab.com

Margie, Director of Education and Public Programs, Sonoma Valley Museum of Art

Mary, Graduate Student, University of Washington

Tyrena, Camp Coordinator, Santa Barbara Museum of Natural History

Recycled Art Sculpture | Tinkerlab.com

Jamie, Mutual of America

Elizabeth, Santa Cruz Museum of Natural History

Carl, Director of Education, Curiodyssey

Recycled Art Sculpture | Tinkerlab.com

Maria, Museum Studies Student, San Francisco State

Elise, Long Beach Museum of Art

Dawn, Curator, Heidrick Agricultural History Center

Recycled Art Sculpture | Tinkerlab.com

Conny, Graduate Student, San Francisco State

Kristine, Community Education Director, Santa Barbara Museum of Natural History

Mandi, Exhibit Envoy

Invite us to your School or Event

Thanks to everyone who played with us in Napa at the CAM Conference. It was so nice to meet each of you. If you’d like to have us come out and lead this or another maker project at your school or event, shoot me an email at rachelle at tinkerlab.com

Buy a TinkerLab® Mystery Box

Click here to buy your own mystery box, a TinkerLab.com exclusive.


Filed Under: Art Activities, Maker, Recycled, Sculpture

DIY Menorah made from Clay

By Rachelle

air dry clay menorah with kids

Today I’m sharing how to make an easy DIY menorah that are easy enough for even toddlers and preschool children to make. These menorahs are made with air-dry clay, so no baking is necessary.How to make clay menorahs in preschool | TinkerLab

Supplies – Clay DIY Menorah

This post contains affiliate links.

  • Air Dry Clay
  • Small bowl of water
  • Clay tools such as popsicle sticks, rolling pins, and cookie cutters
  • Acrylic paints for painting the surface. Liquitex is a solid brand.
  • Mod Podge or acrylic clear coat to seal it with a shiny coating

A note on clay: Crayola Air Dry Clay feels just like the clay you throw pots on, and my kids were enthralled by the texture. So unlike play dough, and it has the potential to make long-lasting objects.

Steps

  1. Cover your work surface with a vinyl tablecloth or work on a non-precious surface that easily wipes clean.
  2. If you’re making a Hanukkiah (it holds nine candles, rather than seven), talk about the story of Chanukah and how the Chanukah menorah has eight candles + 1, the shamash, to represent the miracle that oil burned continuously for eight days. I like this kid-friendly version of the Hanukkah Story.
  3. Set up clay, water, and clay tools.
  4. Invite your child/ren to make menorahs. Encourage creativity and original thinking.

How we made our DIY Menorahs

air dry clay menorah with kids

  1. We looked at a metal Hanukkiah for inspiration, and talked about its shape and function.
  2. We rolled out some clay and I invited my preschool daughter to poke holes in it with a menorah candle. Menorahs hold nine candles, eight for the eight nights of Hanukkah, and a ninth called the shamash (meaning “attendant”) that lights the other candles.

air dry clay menorah with toddler

My toddler joined the fun, too! She’s been copying everything her sister does, and after seeing this magic, I wished I had given her a bigger piece of clay to play with.

air dry clay menorah with kids

3. To make room for the shamash, we decided to build a little mound by making a ball of clay, scoring both sides of where it would connect with hatch marks, and then pressing the pieces together.

air dry clay menorah with kids

4. We used a little water and a popsicle stick to smooth out the edges. I read that if there are cracks in this clay it can fall apart once dry, so we were sure to smooth all those cracks right out with water.

air dry clay menorah with kids

air dry clay menorah with kids

5. N decided to use a wooden stick to poke a pattern of holes all over the menorah.

air dry clay menorah with kids

6. She added a hole for the shamash.

air dry clay menorah with kids

My little one was happy to play with a small pot of water and the goopy clay.

We’re enjoying the season, and I think we’ll make salt dough ornaments tomorrow!

More Winter Holiday Crafts and Projects

Snowflake Collage Activity for Kids
DIY Activity Advent Calendar
How to Draw a Cute Snow Globe
Dried Mandarin Garland for Festive Christmas Decorating
cranberry popcorn garland
Cranberry Popcorn Garland
21 Kids Christmas Ornaments Kids Love Making
21 Kids Christmas Ornaments that Your Kids will Love Making
Pom pom Christmas bauble craft project for kids
Pom Pom Christmas Bauble Ornaments
DIY kids pinecone Christmas ornament
Pom Pom Christmas Pinecone Ornament Craft
Caramel Chocolate Pecan Turtle Recipe
Handmade Holiday Cookie Jars | TinkerLab
Easy Handmade Gifts | Cookie Dough Jars
1 2 3 Next »

Filed Under: Art Activities, DIY, Hanukkah, Pre-School, Sculpture, Winter Tagged With: children, clay, diy, hanukkah, kids, menorah, winter

How to Make a Holiday Paper Star

By Rachelle

How to make a paper star

Today I’m going to share how to make holiday paper stars with your kids.

If you have young children, the first half of the project will be kid-centered as they color and decorate the paper as they like. Once that’s done, adults will assemble the stars.

Okay, are you ready?

how to make a paper star

Supplies – Giant Paper Stars

  • Two pieces of thin paper – we chose large sheets, but small would also work
  • Mark-making tools
  • Glue
  • Scissors
  • String

I found an easy, workable tutorial at The Magic Onions for our paper stars.

decorate paper stars

I cut large squares from four sheets of 24″ x 36″ drawing paper. You know, the trick where you fold a triangle in the paper and then snip the excess rectangle off?

I taped that extra rectangle to the table so that my daughter had a place to store her rubber stamps and pens.

Pine cones and snowflakes in a limited palette of red, green, and silver.

Snowflakes, sea stars, and Stars of David. That’s how we roll.

The tutorial over at The Magic Onions is really clear, so I won’t get into the details here, but suffice to say that once you make one, you’ll want to keep cranking them out. They’re so simple!

I used Elmer’s Craft Bond Extra Strength Glue Stick to seal the paper right up. Worked like a charm.

Waiting for it to dry.

I cut a piece of cotton string, about 3′ long, so we could hang it from the ceiling, and taped it about 3″ inside one of the points.

Then I ran a line of Elmer’s School Glue under the string to give it extra support and along the edge of the point. A little clamp helped keep it all together.

hanging paper star diy

Sticking the pieces together. This was a little tricky. I placed the pointy face of one star in a bowl, rested the other star on top of it, and added bits of school glue to hold it in place. I gave it overnight to dry, but school glue seems to dry in under an hour.

hanging holiday paper star diy

There you go! 

Since I already the drawing paper, stamps, and string, the whole thing cost $0.00! But the materials are so low-cost and flexible anyway, that I bet you could do it too with wrapping paper and ribbon after opening gifts on Hanukkah or Christmas. Or make them from all the extra art work your kids bring home from school. Newspaper colored with potato prints. What do you think?

Filed Under: Christmas, Craft, DIY, Elementary, Pre-School, Sculpture Tagged With: children, decoration, diy, hanging, holidays, kids, lookforless, paper star

Next Page »

Copyright © 2021 - TinkerLab ® - All Rights Reserved - Privacy Policy